If you’re reading this it means that you want to change your ordinary home in the Smart Home. Great! I also hope that you, like me, are enthusiasts of DIY projects. Don’t worry if you don’t have much experience in this field. I prepared this guide just for someone who is just entering this wonderful, electronic world 🙂 The only thing that is necessary is enthusiasm and a bit of perseverance!
Let’s dive in!
Introduction
Here is the second part of the guide on “How to start a Smart Home”. In the first, I explained the basic concepts and the general definitions of such a system. I also talked a bit about the division into open and closed systems. If you haven’t read it and would like to make up for it, I invite you HERE.
In this part, I will focus on the selection of hardware, on which we will install a new and fresh Home Assistant. At the end of this article, your HUB will be installed and pre-configured!
Disclaimer
There are many guides on this topic on the web. Some of them are really professional and reliable. Like the one on the official Home Assistant website. However, in my opinion, if you are just starting your adventure with Smart Home you may be lost in several places. There is some ambiguity and understatement. In this guide, he will fill these gaps with his several years of experience 🙂
Why Home Assistant is the best Smart System?

The answer to this question is not obvious. A lot depends on personal preferences. But I will try to answer specifically. As I wrote in the previous part, in the DIY segment, the choice comes down to three systems: OpenHAB, Domoticz, and Home Assistant. Of course, they are different, smaller, but in my opinion, it isn’t worth bothering with them.
I “played” with each of these three, but I stayed with HA for longer. And I have four confirmatory arguments, hat my decision was right 🙂
- Has the most ready integrations – currently (07.2020) there are over 1600, and new ones are added every few weeks.
- Regular updates – there is often an update every other week, which adds new functionality or removes bugs.
- Community – this is probably the most significant advantage. She is accommodating, committed, and very big. On the official forum, every day appear hundreds of new posts. If you have any problem you will certainly find help there.
- Functionality – in addition to official plugins, integration, addons users share theirs (unofficial). So there is a lot, a lot of it. And if you need some specific functionality that no one has done yet, you can do it yourself. It’s not that simple and requires knowledge of the language Python, however, this is feasible.
HINT
Disable automatic updates, and don’t do it immediately when it appears. Admittedly, this version is already stable and tested, however, sometimes just shortly after the premiere there are smaller or bigger bugs. Wait a few days then they should already be repaired.
What Home Assistant hardware?
Most computers (classic and single board), on which you can run Linux will be ok. So you can install it on your home PC or MAC. Of course, not only directly – on the virtual machine. However, this isn’t the best solution in my opinion. I believe that this solution completely misses the main goal, which is:
- low power consumption
- always on
- small dimensions
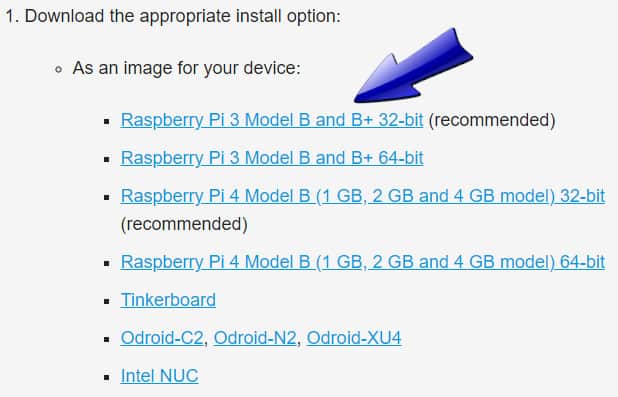
Single-board computers such as Raspberry PI, Tinkerboard, Odroid, or Intel NUC are ideal for this purpose. The only requirements you’ll find on the Home Assistant website are:
- Storage (Flash) – 32 GB
- RAM – 1GB
- Network – 100 Mb / s
HINT
If you are planning a long-term solution, and you don’t want to have to change equipment soon, I recommend you use 64 GB flash memory. Price-wise there isn’t much difference, and with the time 32 GB may not be enough. Also, if you want to handle images from several cameras, there should be more RAM. 4 GB or more should be enough.
In this guide, I will use Raspberry PI 3b as an example, because I have it in a drawer 🙂 Despite the appearance of the fourth generation, this one is still very popular. And if you don’t plan complicated calculations then it will be more than enough. Personally, I use the same model for a long time, and I haven’t had problems with it yet.
Nevertheless, the procedure looks the same no matter which platform you choose.
What do I need to start?
In addition to Raspberry itself, you will need several additional elements. Some are necessary others optional.
Memory card
Raspberry Pi has no built-in flash memory. So you need a memory card. Choose the fastest – class 10 would be perfect. Don’t choose any cheap models. Your entire system is as trustworthy as its weakest element. To avoid problems, buy something branded.
Alternatively, you can also install Home Assistant on an SSD, which is generally an even better solution. However, this guide is intended to be the simplest path to creating a Smart Home. Using SSD instead of SD card complicates this process a bit. If you would like me to make a separate article about it, let me know in the comment. I will write about it with pleasure.
Memory Card Reader
Before you insert the card into RPI3, you need to transfer the Home Assistant image to it. For this, you need a memory card reader. Maybe you already have such a built-in laptop? If not, you can buy it absolutely everywhere for pennies.
Power Supply
It is rather obvious. Every electronic device needs electricity 🙂 In this case, just like with a memory card, don’t save, and don’t buy some cheap “noname”. Note what current your platform requires and take a little stronger. For Raspberry RPI3, the 2.5 A power supply will be ok.
USB stick (optional)
If you want to use WIFI and not an Ethernet cable, it’s most convenient to configure it with a USB stick. You can also do this configuration directly on the memory card, but I assumed you already have a pen somewhere nearby. Besides, we will need a USB stick in the following parts.
Housing (optional)
It fulfills aesthetic and protective functions. If your Hub location is in a visible place or will be exposed to touching and moving – then buy a case. If you plan to close it, e.g. in a cabinet with a router, then no housing is needed. What’s more, its lack will improve heat dissipation.
Heatsinks (optional)
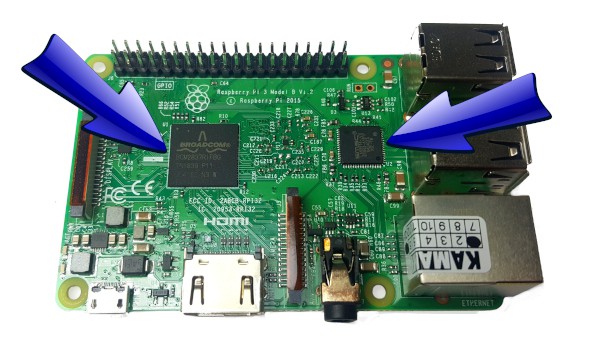
Now that we’re talking about heat dissipation … In Raspberry PI 3b, two chips can get very hot. They are the processor and the Ethernet controller – I marked them below. Buy small heat sinks and stick them on the chips. This will improve heat dissipation.
HINT
Heatsinks should only be on chips. Don’t buy them too big. If they stick out beyond the outline, they may cause a short in the circuit.
Installation of Home Assistant – step by step
Ok, everything is ready. Finally, we can go to the proper part, i.e., the installation itself. To make it easier, I’ve broken procedure down into bite-sized chunks. In each of them, we will deal with only one aspect.
Step 1: Software Download
Then go to the balenaEtcher website, and download the version depending on the system you are working on. There is a version for Mac OS, Windows, and Linux.
Step 2: Installation of balenaEtcher
There isn’t much to write here. Run the installer, agree to everything and after three seconds it is ready.
Step 3: Flashing memory card with HA image
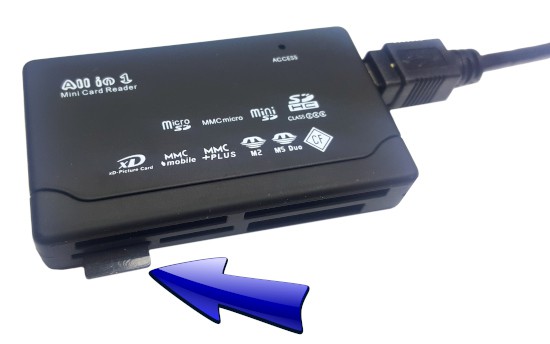
- Connect the card reader and insert a memory card.
- Launch balenaEtcher (unless it’s already running).

- Click on Flash from file and select the file with the Home Assistant image from disk.

- Now click Select Drive and select your memory card.

- Click Flash! button. The flashing and validation process will start. It may take a few minutes.
- If everything went correctly, you’ll see the following window.

Step 4: Internet connection
To install Home Assistant – Raspberry must be connected to the internet. You can do it via WIFI or via an Ethernet cable. Below I will present both options.
WIFI
In order to configure WIFI, the USB stick I mentioned earlier will be useful.
- connect it to your computer
- format using FAT32 and name it CONFIG
- create network folder
- inside, create a my-network file without extension
- edit it with a notebook and paste it inside:
[connection]
id=my-network
uuid=72111c67-4a5d-4d5c-925e-f8ee26efb3c3
type=802-11-wireless
[802-11-wireless]
mode=infrastructure
ssid=MY_SSID
# Uncomment below if your SSID is not broadcasted
#hidden=true
[802-11-wireless-security]
auth-alg=open
key-mgmt=wpa-psk
psk=MY_WLAN_SECRET_KEY
[ipv4]
method=auto
[ipv6]
addr-gen-mode=stable-privacy
method=auto
- Set your SSID, password, and it,s done!
ETHERNET
Connection via cable doesn’t require any configuration. Just plug it into the Ethernet socket. Do this before connecting the power supply.
Step 5: Home Assistant installation
Connect the configuration stick to the USB socket (or Ethernet cable), and insert the memory card into the slot. Now you can to connect the whole to the power supply and be patient 🙂 The whole process may take about 20 minutes.

FAQ
How do I know how the installation goes? I haven’t connected the monitor!
After a few minutes of connecting the power supply, a device called homeassistant should be visible on your home network. To view the installation status, simply enter the IP address in your browser, and at the end add a port number: 8123. e.g. xxx.xxx.xxx.xxx:8123
HINT
Instead of IP, you can enter “http: //homeassistant.local: 8123”. However, in many cases, this will not work. Not all routers support mDNS, which is required for this to work. Therefore, it will be more reliable when you enter the IP there.
How to check the IP?
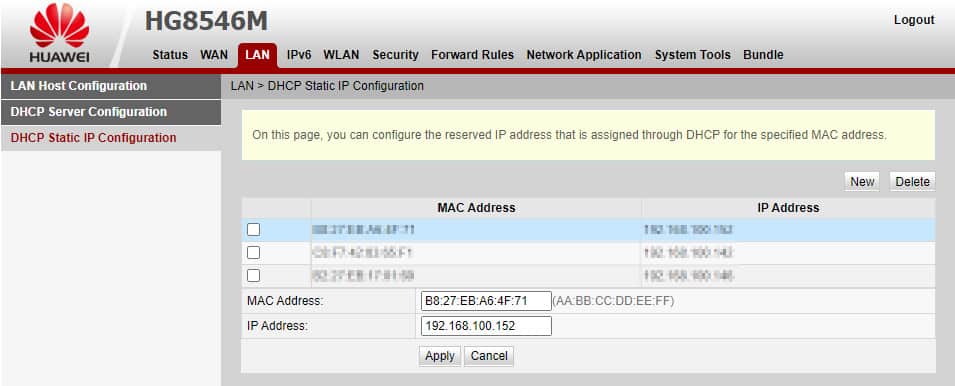
To check which IP address has been assigned, it’s best to check the router’s DHCP settings. In my case it looks like this:
HINT
Set a static IP for Home Assistant. Otherwise, after the reset, the router may give a new address, which means you won’t be able to access your system. This isn’t a major problem if you are at home. You can fix it quickly. It is worse if only your wife is at home. Explaining how to get into the router and how to check the IP by phone isn’t a simple task. Believe me, I tried 🙂
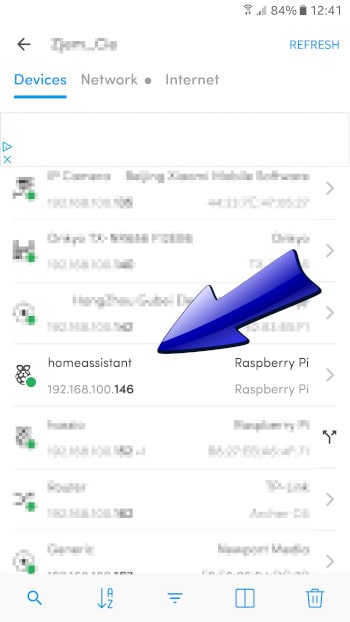
The second way to find the IP address is to install the Fing application on your smartphone. There is a version for both IOS and Android. Thanks to it, you can check all devices that are on the same network.
As you can see in the screenshot below, both methods give the same result.
How to set a static IP?
Unfortunately, it looks different in every router. I will show you how it looks in my case (Huawei HG8546M), to give you an idea of what option to look for in your model. For sure you will also find a description on the producer’s website, or on some forum.
Step 6: Logging in to Home Assistant for the first time
During installation, after entering the IP you will see the following screen:

It means that everything is going well. After the installation is completed, you will see the login screen.

Complete the form and click CREATE ACCOUNT. You will be guided through a short configurator. You can easily skip it. You can come back and change something at any time.

In the last config screen, Home Assistant will show you if a compatible device will be online. In my case, it detected Google Cast. It may look a bit different for you.

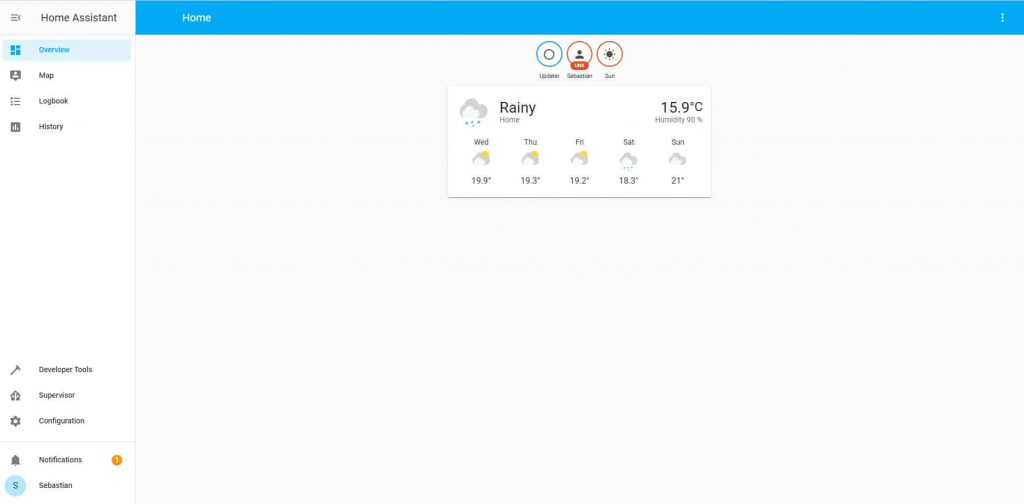
After clicking FINISH, your Home Assistant is up and running! Congratulations! 🙂
Summary
In this part, we have installed Home Assistant on Raspberry. So the most crucial thing in our Smart System – its brain, is ready! For now, there is not much in it, but it will change very soon:)
In the next part, we will discuss the interface and install the basic plugins, from which it is worth to start this adventure.
Related Articles
How to program an ESP8266 – With and Without Arduino
I discovered ESP8266 a few years ago. Since then, I’m…
How Relay works? – The Complete Illustrated Guide
The Relay (EMR or Electromagnetic Relay) is an electro-mechanical component…
How does a Stepper Motor work?
A Stepper Motor is a brushless DC motor that converts…

