Free energy from the sun – sounds great right? It can power small devices such as calculators, watches, or even entire houses and estates! Photovoltaic panels are increasingly efficient every year, so they can be smaller and cheaper.
They are perfect to power your small DIY projects. If you have not been interested in this technology yet, this is the perfect opportunity to do so.
Introduction
Surely everyone knows that analogy, “Give a man a fish, and he’ll eat for a day. Give him a fishing rod, and he’ll eat for a lifetime.”
This article will be your “fishing rod”. If you are looking for a power source that will not involve changing the battery, and the use of a cable isn’t possible then solar panels could be the answer.
Of course, you will need access to the sun. So the temperature sensor in the garage isn’t an option 🙂
I divided the article into two large chapters:
- How does a solar collector work? – You will learn, among other things, how it works and how it is built?
- How to use a solar panel in your project? – Here I will show you the path of how to choose the right panel and what apart from it is needed to make the device self-sufficient.
If you are totally not interested in what magic is responsible for turning the sun’s rays into electricity, then you can go straight to the second chapter. However, I encourage you to at least try with the theory. I put a lot of effort into showing that the engineer was writing this, not the chemistry teacher.
How does a solar cell work?
A solar cell consists of two types of semiconductors (mostly silicon), separated by an insulator – PN junction. The sun’s rays are causing excitation of an electron from the last shell of an atom. As a result, one part becomes negatively charged – type N, and the other positively – type P. After connecting the electric load, the potential difference is sufficient for the current to flow.
If you feel unsatisfied with this answer, continue reading. Below I literally smashed it into atoms 🙂
An Atom, a Nucleus, an Electron – a little bit of chemistry
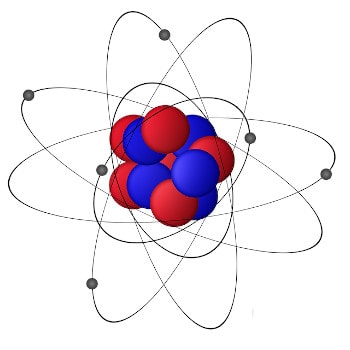
For the rest of the article to make sense, I need to start with concepts such as atom, proton, neutron, electron, and everything related to it. At the outset, I will say that I am not a scientist and I don’t have a Ph.D. from chemistry. Therefore, I will not pretend that I know more than I actually know. I will only tell you what actually matters.
As you probably know, everything around us is made of atoms, which are made of a nucleus (protons and neutrons), and the electrons orbiting around it. Orbits or the shells on which they circulate are strictly fixed and there can be a maximum of seven – at least in the chemical elements we know. You can think of them as planets orbiting a star.
These shells are differently distant from the nucleus of the atom, and each of them can contain a strictly defined number of electrons. However, the most interesting is the last one (valence shell). Thanks to this, it is possible to combine atoms into chemical compounds. This shell also has the most significant effect on the properties of the atom. It also has the weakest bonding, and it is the electrons from this shell that are best knocked out by providing energy.
Example
The most important element in the world of electronics is silicon called “Si“. So let him serve as an example for us. From the Periodic Table, we can read how many electrons, how many valence electrons, and how many shells there are.
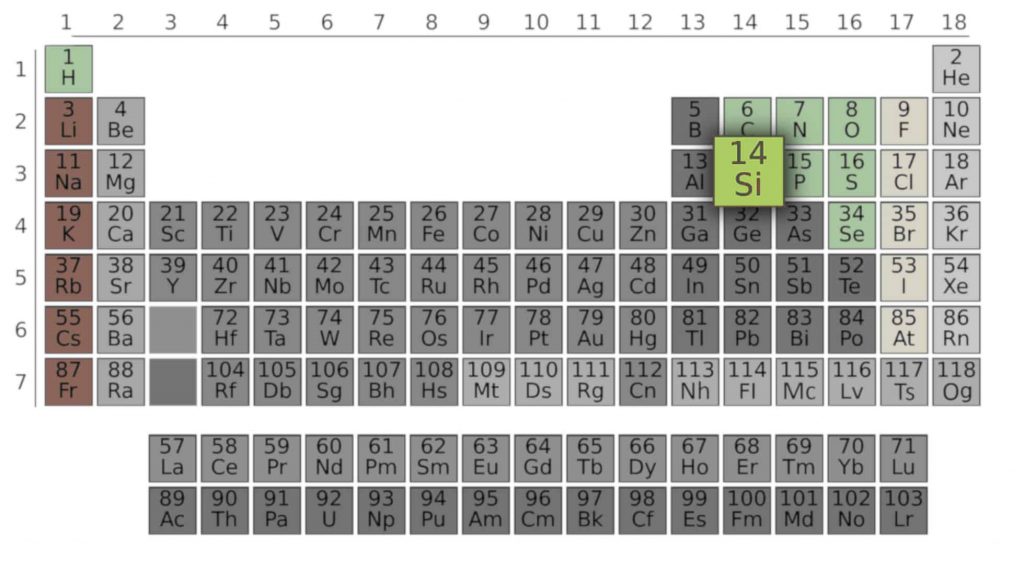
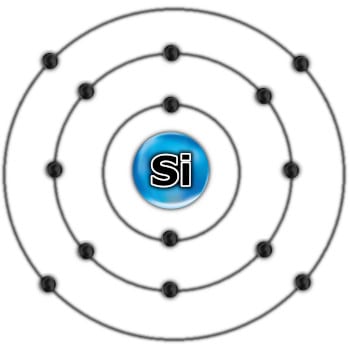
Line number (three) indicates the number of electron shells. From the column number (fourteen), we can read the number of valence electrons – it is the number of ones: four. An ordinal number, in this case also fourteen is the total number of electrons. The formula “2n²” (where “n” is the shell number) allows you to calculate how many electrons are on a given shell. However, we are only interested in the valence shell, and this can be read straight from the table.
In summary, the two-dimensional model of silicon looks like this:
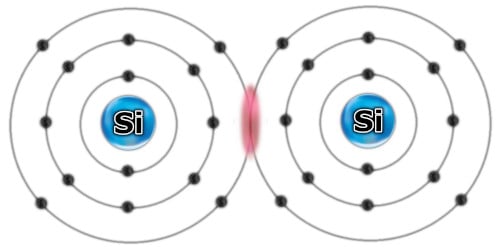
As I wrote earlier, it is the valence shell that allows elements to combine into complex chemical compounds. In most chemical elements, it isn’t completely full, which means that there is an energetically “place” for more electrons. This is how they connect – they share their valence electrons.
Noble gases (column 18 of the periodic table) have a full set of electrons on the last shell. That’s why I don’t want to combine them with other chemical elements, therefore they are called “noble”.
What is current, conductor and insulator?
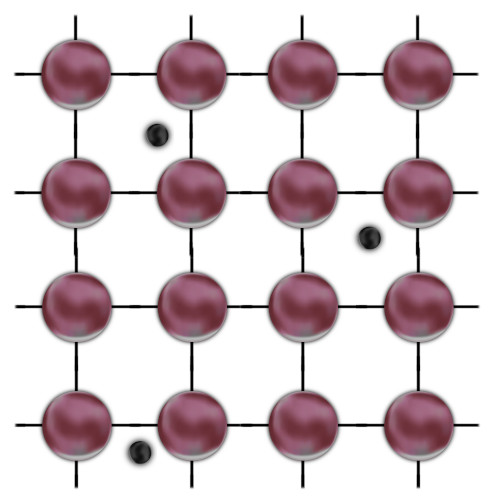
Current is nothing more than an orderly flow of electrons under the influence of a force, e.g., a potential difference. Therefore, for a given material to be called a conductor, it must have electrons that can move freely inside it – Free Electrons. Whether or not they will depends on the method of chemical bonding, if not all electrons take part in it, they can be easily torn off and transformed into free ones. Energy is needed for this, but often room temperature energy alone is sufficient.
Two-dimensional model of the conductor. Large colored spheres symbolize atoms, lines between them are bonds, and small black spheres are free electrons.
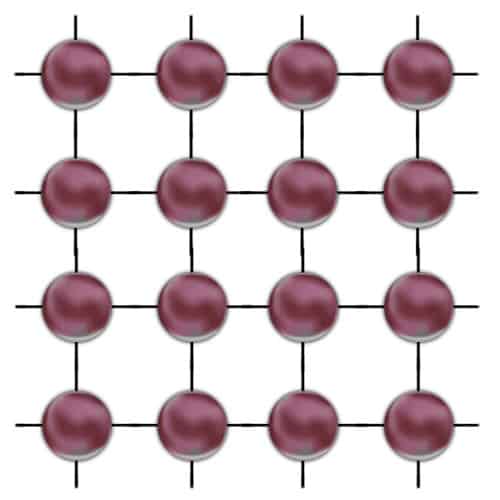
The opposite of conductors is (who would have expected 🙂 ) an insulator. The insulator has no free electrons, or has very few of them. In this case, the type of bond is such that there are no easily detachable electrons in the material. So until enough energy is delivered (e.g. extreme temperature), the material remains the insulator.
The model looks almost identical, only free electrons are missing.
In addition to conductors and insulators, there are so-called semiconductors …
What is a semiconductor?
A semiconductor is a material that behaves like an insulator under certain conditions – very few free electrons. Under other circumstances, it has low resistance and free electrons, which allow the current to flow.
Common semiconductors are: silicon, germanium, gallium arsenide, or gallium antimonide. In this article, I will focus on silicon.
In the figure below, I have drawn a very simplified model of a single crystal of silicon. The large colored spheres are the core and inner electron shells, and the black ones are valence electrons.

As you can see in this case, all the valence electrons take part in the bond, if so, they are tightly bound and not easily knocked out of orbit. Thus, a chemical compound consisting only of silicon is an insulator.
N-type semiconductor
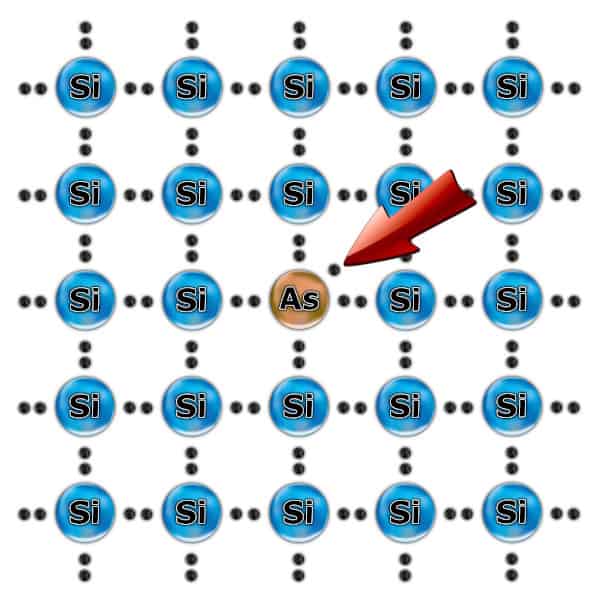
Adding another element to the material is called doping. You can change its features this way. Doping an element with more electrons in the last shell (e.g. Antimony or Phosphorus) disrupts the ideal structure of the silicon. An additional electron isn’t involved in the chemical bond and is very easy to detach. This is how an N-type semiconductor was created Due to the increased number of electrons, it has a Negative charge.
P-type semiconductor
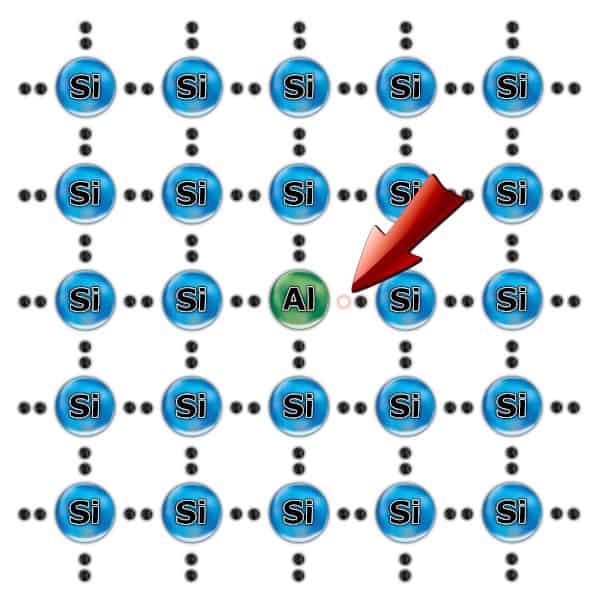
This type of semiconductor is the opposite of an N-type semiconductor. In this case, an atom with three valence electrons (e.g. Aluminum or Aallium) is doped with the silicon crystal. There are fewer electrons than needed, so appear the so-called holes. Therefore, this semiconductor has a Positive charge.
PN junction
Now we come to the most exciting part 🙂 When we put together these two types of semiconductors, free electrons from the N-type semiconductor will fill the holes of the P-type semiconductor. It will create an electrically neutral PN junction. It is an excellent insulator that prevents further electron migration.
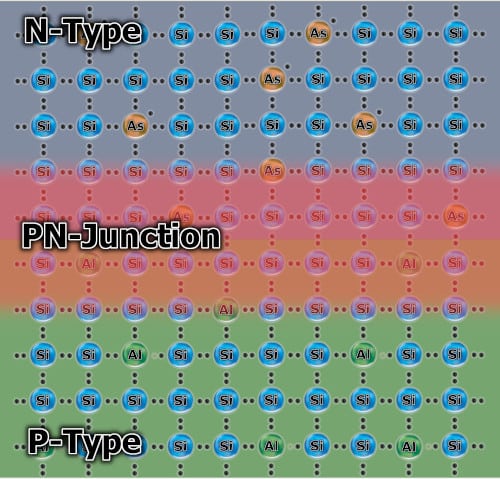
So we have one part with a negative charged, the other one positively charged, and insulator between them. Now, if we were to conclude the “negative” part with the “positive”, it can be said that the current is flowing. However, it will balance very quickly because either all the holes will be filled or the free electrons will run out.
If only we had a way to “produce” new electrons and holes… 🙂
Photovoltaic effect
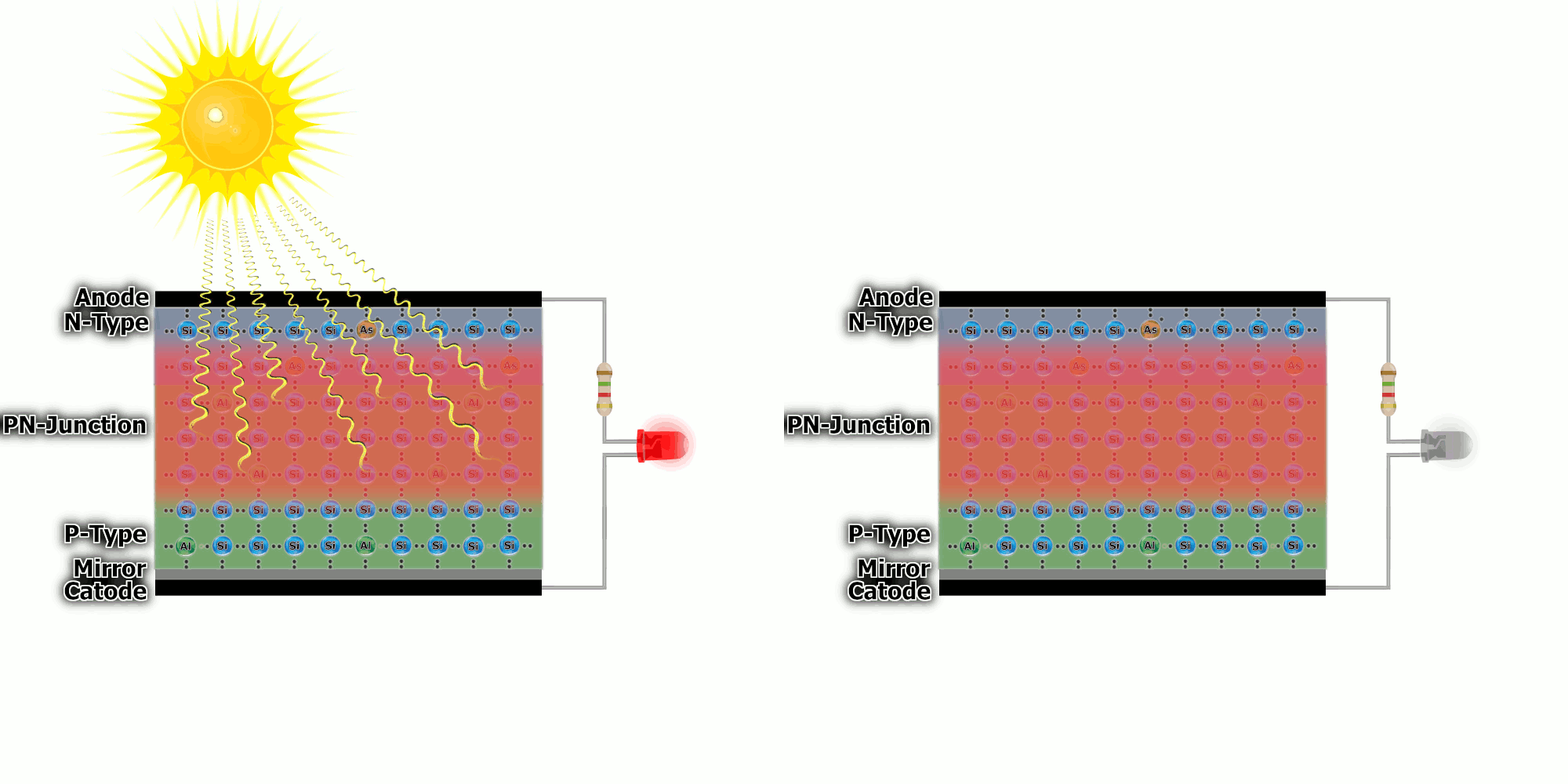
The photovoltaic effect occurs when the energy of the sun’s radiation hits on the PN junction. The photons knock out the electrons creating a free electron and a hole at the same moment. The electron is attracted to N-type of semiconductor, and the hole to P-type. In this way, as long as the sun shines into the surface, new holes and electrons will be produced. It creates a potential difference, connects the load e.g. LED – current is flowing.
Construction of a solar cell
There are several additional elements in the real cell that increase efficiency. The N-type layer is the top layer. It is thin, transparent to solar radiation and is strongly doped so that there are a lot of free electrons. The lower layer (type P) is definitely thicker and less doped – it has fewer holes. This makes the PN junction much wider because the electrons have to travel further to fill the holes. This increases the efficiency of the cell.
Another trick is to use a reflective layer at the very bottom of the cell, thanks to this, rays that hit the bottom can bounce and have a chance to knock out an electron.
Additionally, there is a negative electrode at the top and a positive electrode at the bottom, which is physically connected to the load.
What is the efficiency of solar panels?
You already know what the photovoltaic effect is, and how solar energy is converted into electricity. Let’s check the performance of small panels.
I bought three such panels: 1W, 2W, and 3W. All have 6V output. You can buy them anywhere for a few dollars. Which makes them perfect for DIY projects 🙂
The solar panel consists of single cells connected in series. About 0.5 V can be obtained from one cell. Therefore, there are 12 cells in my 6V panels. Their power (max current) depends on the size.
How does the voltage depend on the current consumption?
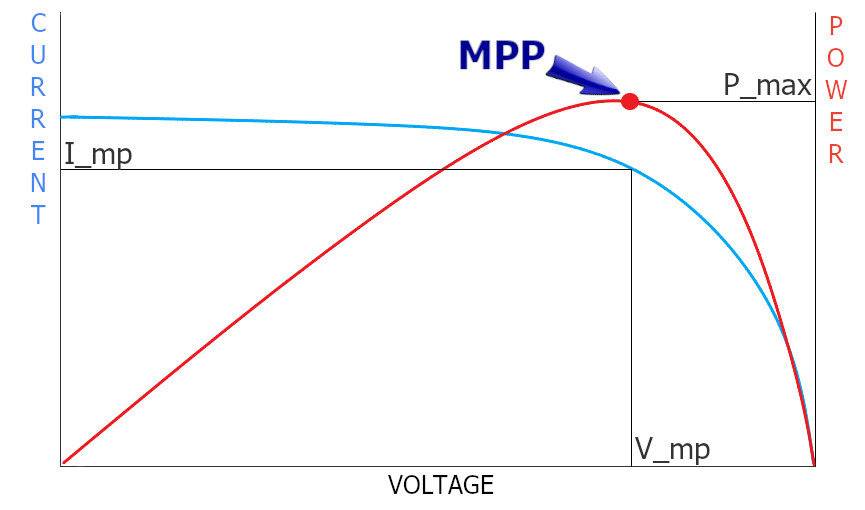
Photovoltaic cells have a specific voltage vs current characteristic. When the circuit is open, when there is no load connected to it, the output voltage is maximum. When the current consumption increases, the voltage drops slightly. Until.. After exceeding a certain value, the voltage drops immediately.
And as you probably know POWER = CURRENT * VOLTAGE. This means that the maximum performance of the panel is at a very precise point on the characteristics. This point is called MPP (Maximum Power Point).
How does it work in real life?
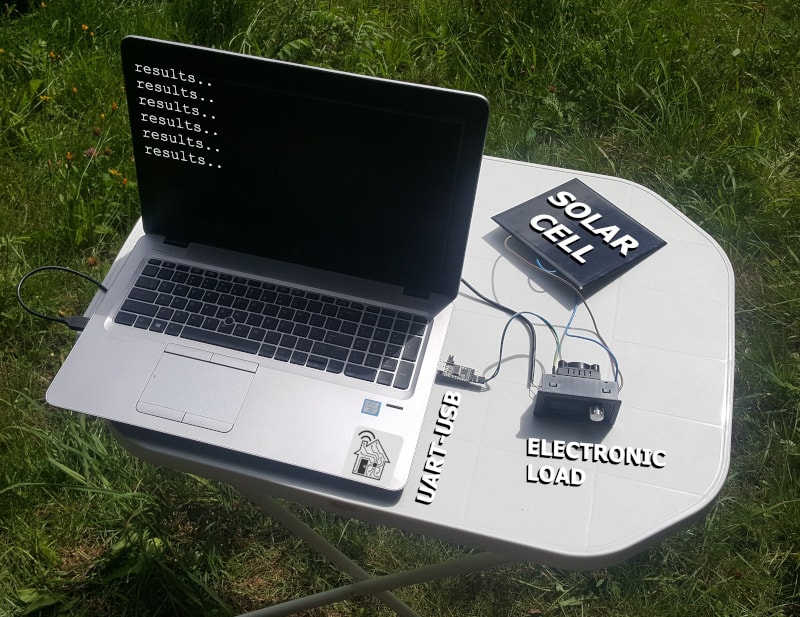
For this experiment, I used: an Electric Load, a UART-USB adapter, a laptop, and of course a solar panel. The most interesting element is probably the Electronic Load. It is nothing more than a large potentiometer with a voltmeter and ammeter. By increasing the load smoothly, I could observe the current and voltage. To simplify writing the results I used the UART interface. I could also write it with a pen on a piece of paper .. but we are the 21st century 🙂
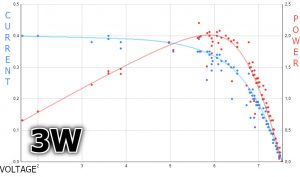
I put the obtained results from the UART Terminal into Excel, which took care of making nice charts – the results below. The blue graph shows the current and the red one shows the power. The current values are read directly from the ammeter, while the power is calculated.
As you can notice, my actual charts are very similar to the ones I showed earlier. Their shape will be similar no matter how bright the sun shines. However, there will be other values. Despite the fact that I tried to do the experiment under ideal conditions, I couldn’t achieve the nominal power of the solar panel. But it’s close.
What else do I need to use a solar panel?
The voltage at the output of the solar panel is very variable. The angle of the rays is constantly changing, clouds obscure the sun, and even the ambient temperature affects the efficiency. Not to mention the obvious that the solar panel doesn’t work at night 🙂
Therefore, between the panel and the device, we need a buffer that will store energy, i.e. a BATTERY. To charge it, we need a CHARGER. And last but not least – VOLTAGE REGULATOR will make sure that the device gets exactly what it needs (mostly 3.3 or 5 V).
Battery

In order for your device to survive the “dark times”, it must have an energy store. The LiPo battery is perfect for this purpose. They are cheap, easy to handle, and have nice shapes that are easy to fit in the design – flat cuboids. In the simplest version, when they have a single cell, their nominal voltage is 3.7 V. In the case of a 3.3V power project it is a perfect solution.
What battery capacity will be sufficient?
In order to determine the capacity you need to know two things: how long it should run without the sun, and what is the average power consumption of your device.
I can’t help you, with the first issue. It mainly depends on where you live. In my case, I live in Poland, it happens that I don’t see the sun for the whole week. Therefore, for safety reasons, I would assume that my device is supposed to last at least 10 days.
I’ll help you, with the second issue 🙂 I’ve prepared a simple calculator that will allow you to calculate how many days your battery-powered device will run. You have to establish how much power the device consumes in normal mode and how much in sleep mode. You also need to know how often and for how long you will wake the device.
HINT:
The battery doesn’t always have the capacity indicated on the label. When they are old, of a poor manufacturer, or operate in extreme temperatures, the capacity may decrease. Therefore, don’t choose the battery “tight”. Better to have some extra storage capacity.
Charger + Voltage Regulator
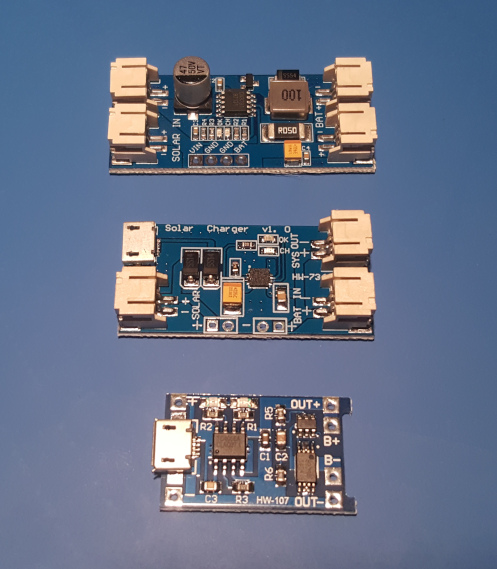
Generally, solar panel chargers can be divided into three categories: linear, switching, switching with MPP detection. I bought and tested each of them and … the differences are truly symbolic.
What is the power of a solar panel needed?
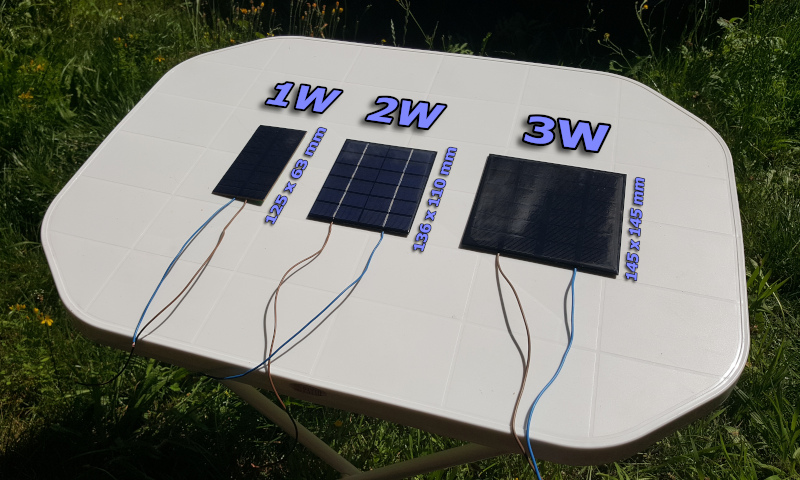
As you can see in the photo above, the size of the panel is directly proportional to its power. To increase the power twice, we would have to enlarge the area (more or less) twice.
I recommend you solarelectricityhandbook.com. There you will find an online calculator that uses your location to determine the average amount of solar energy per m².

I live in Gdańsk, Poland. From the calculator, I can read that the worst month is December. Then, about 0.51 kWh/m² of solar energy reaches the ground.
As I wrote earlier, we can assume that the efficiency of such a cell is 15%. So we can effectively use 0.0765 kWh/m², or 76,5 Wh/m². Unfortunately, the next losses are on the charger. Depending on the type, they can be larger or smaller. For safety, let’s assume that its efficiency is 70%. So we can only use 53,55 Wh/m² in the end.
We determined the capacity of the battery earlier, now we can calculate how quickly it needs to be charged. I assume that the entire capacity of the battery is to be recharged in one day. Most of the time, your battery will never drain that much, but it’s nice to have a buffer.
Having all these data, we are able to determine the minimum surface area of a solar panel. To make your life easier, I have prepared one more calculator 🙂 Enter only Average Solar Insolations and Battery Capacity – I’ll do the rest.
The calculated value is in square meters. To choose the right panel, you just need to multiply the length and width. The result you get should be greater than the one you got above.
Summary
You now have complete knowledge of small solar panels. You know how, and why they work. How to choose the right panel for your needs. You also know what battery and what charger will need to make your device fully self-sufficient, even in the worst month.
Related Articles
The best Air Quality sensors for Smart Home
According to the World Health Organization even 7 million people die each…
How does a Stepper Motor work?
A Stepper Motor is a brushless DC motor that converts…
How to detect mains voltage with a microcontroller?
The easiest way to detect mains electricity using a microcontroller is…

