

In this article, I’m gonna show you how to program any STM32 microcontroller. As an example, I’ll use the Nucleo-L053R8 Evaluation board. But you can use any board. Also, a custom one, designed by you.
First, we’re gonna take care of what do we need hardware and software-wise. Then we’ll install the STM32CubeIDE. I will introduce you to the workflow briefly. And finally, we’re gonna write the first super simple program.
What is STM32?
STM32 is a family of 32-bit microcontrollers based on the ARM Cortex-M core and developed by ST Microelectronics. Thanks to the wide range of models, it’s very easy to find the right model for your applications. ST provides an application: ST MCUFinder, which, on the basis of a number of filters, will automatically search for the model/models that meet all the requirements.
Depending on the version, they have a low power consumption and quite limited resources, or a very high speed and a lot of peripherals.
What do I need to program the STM32?
1. Documentation
Before you really use a specific microcontroller in your project, you should at least glance at the datasheet. You should check what peripherals it offers, how many GPIOs it has, and whether the clock is sufficient for your requirements. But relax, you don’t need to read the whole thing, at least not right away 🙂
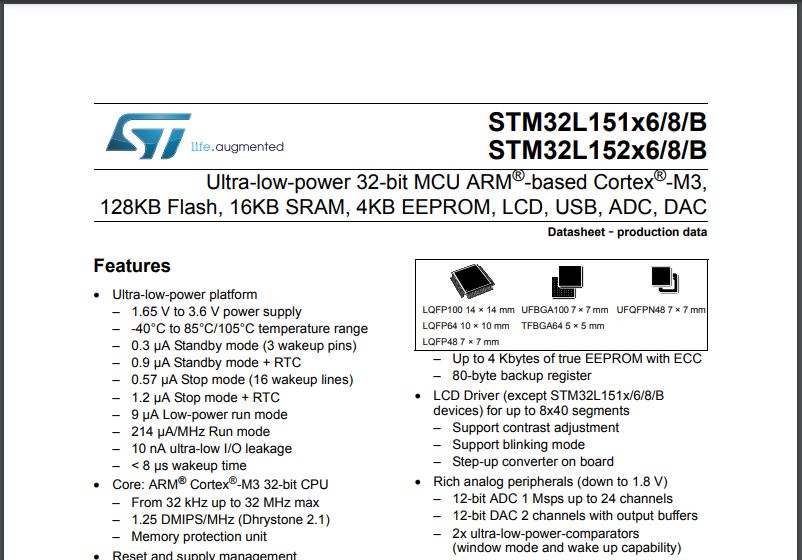
Below, I’m gonna present you several variants of the paths you can follow to develop a project on STM32. Sometimes you need to know the documentation very well, and sometimes you just need to know where it is to look at it when is need it.
2. Language
I mean programming languages, of course. The only correct option here is C. Don’t bother with other creations. The time will come for that once you get the C language.
3. Hardware
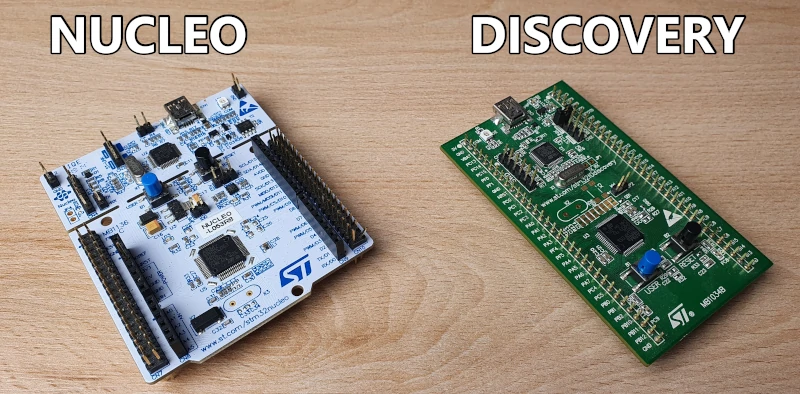
For starters, I recommend any Nucleo or Discovery, evaluation board. There’s an ST-LINK programmer integrated into it, so you don’t need to buy an external one. Additionally, you can use it later to program other STM32 microcontrollers.
Nucleo boards have an Arduino-compatible connector. So if you have any shield for the Arduino UNO board, you can use it with Nucleo. Thanks to this, you have easy access to various types of expansion boards with sensors or controllers.
Discovery boards, on the other hand, very often it has some sensors built into the board. You can also start your adventure without buying any external boards.
You can also choose the recently popular STM32 BluePill. It has a nice, small size, however, it doesn’t have a built-in programmer, so you have to buy it separately. Any STLink V2 clone (like this) will be ok. It cost pennies and you will surely find it locally.
4. Software
ST Microelectronics actively supports developers. That’s why they made available a wide portfolio of free software. I’m not gonna dwell on all the options such as (paid) IAR Embedded Workbench, (paid / free) µVision – Keil, or free SW4STM32 – System Workbench or Eclipse with plugins.

I’m gonna focus on the only right choice in my opinion: STM32CubeIDE. IDE stands for Integrated Development Environment.
What is STM32CubeIDE?
STM32CubeIDE is an all-in-one development software ecosystem. It has integrated: a microcontroller selector, peripheral configurator, code generator, compiler, debugger, and programmer. Moreover, it is completely free for both hobby and professional purposes.
It is based on the popular Eclipse, so its capabilities can be extended even more with external plugins. However, I didn’t need to do that yet.
5. Framework
What do I mean by that? An approach to writing code itself. In the sense of whether and which libraries you want to use. You can choose from:
– Pure C language
If you want your code to be optimized as much as possible, take up a minimum amount of memory, and be super fast this option is for you. However, it’s by far the most difficult path. In this case, you’re working directly on the registers, so Datasheet, Erratum to Datasheet, Application Notes, and Reference Notes you have to get to know cover to cover.
If you are just starting, I strongly advise against this approach.
– Arduino
You’ve probably heard and maybe even used Arduino before. True, it makes it much easier to get started, however it uses a simplified version of the C / C++ language. So learning it won’t let you migrate later on to another IDE, or even to another family of microcontrollers.
Arduino is very limited when it comes to STM32. Only supports a few boards, e.g. BluePill.

Additionally, a lot of libraries are made by the community, so the quality of them really varies. Believe me, I’ve seen some really poor written libraries.
This is why I’m not a big fan of Arduino.
-mBed
The online environment was created for ARM microcontrollers. Such an Arduino for STM32 🙂 But you are writing in classic C / C++, which is a big advantage. Over the last few years, it has grown quite strongly both in terms of libraries and community.
However, I find this environment quite clunky and uncomfortable to use. Although I’ve only used it a few times, I definitely don’t want to go back to it.

– (LL) Low Layers libraries
Low-level libraries integrated with STM32CubeIDE. If you have a limited amount of available memory and your code needs to be well optimized this is the option for you. It requires you to have a fairly good knowledge of documentation and registers. Fortunately, not as much as in the case of “pure C”. These libraries are very oriented towards a specific uC model, so it makes migration a bit more difficult.
– HAL (Hardware Abstraction Layer)
These are high-level libraries also integrated with STM32CubeIDE. I think this is the best option (especially if you are just starting). This is what I’m gonna cover in this article.
Admittedly, the LL has more options, but I’m sure that you’ll not even come close to the limitations of HAL.
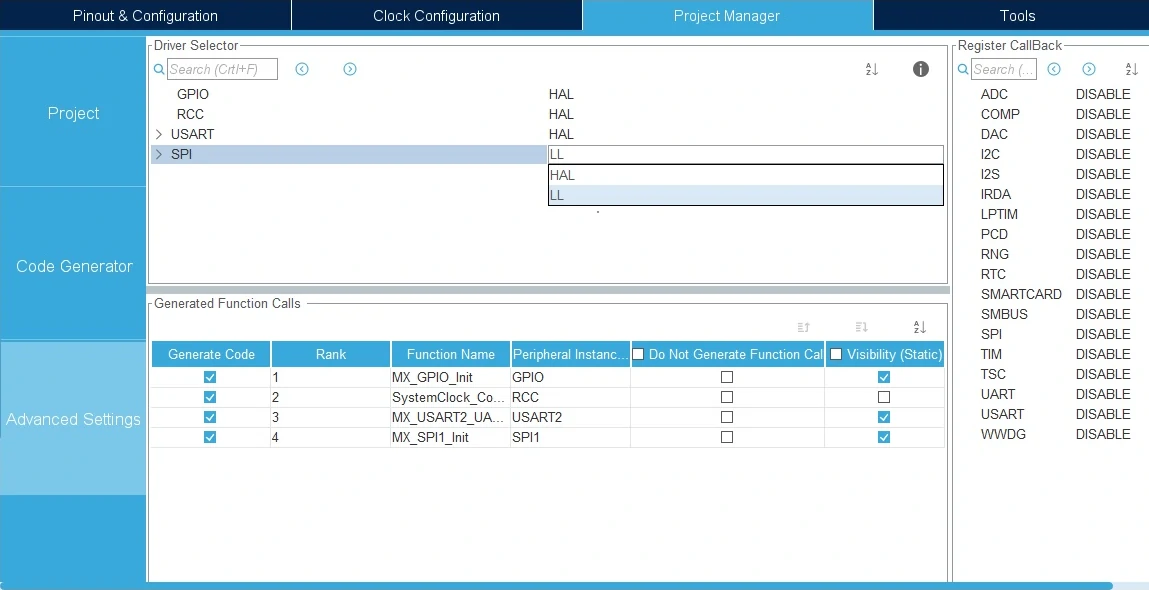
And now, the best part: HAL libraries can coexist with LL libraries! If you want a particular periphery to use LL instead of HAL, you just change the setting in STM32CubeIDE.
Okay, the boring introduction is fortunately behind us. Let’s deal with the main topic of this article!
How to program STM32?
To program the STM32:
- create a new project in STM32CubeIDE
- in Target Selection Tool, select the appropriate microcontroller or Evaluation Board
- give your project a name
- in Device Configuration Tool initialize all the necessary peripherals
- generate a project
- complete this project with your code
- program STM32 by clicking the debug button
In a nutshell, this is what it looks like. Let’s develop each of these steps. To make it even more interesting, we’re gonna program a Nucleo board to turn on the LED every time the button is pressed. Such a “Hello World” in the world of microcontrollers 🙂
STEP 0. Download and installation of STM32CubeIDE
Installation is simple and requires no detailed description. However, to make this article as complete as possible, I couldn’t skip this step.
Download the latest version of STM32CubeIDE directly from the ST website – LINK. There are versions for macOS, Windows, and Linux. To be able to download you need an account there. You can register it when downloading the installation file.
During installation, you can leave all the settings at default, it will be ok.
STEP 1. Create a new project
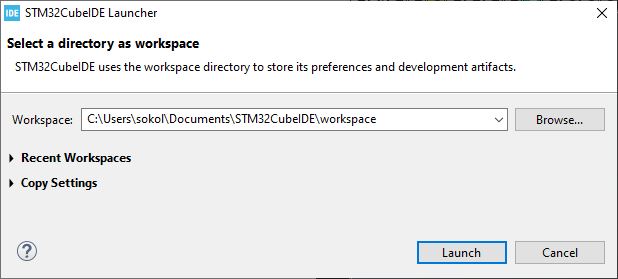
The first window you will see right after running the program will be the STM32CubeIDE Launcher. Choose a location where the IDE is to save and create new projects. You can set any folder, I’m gonna leave the default path.
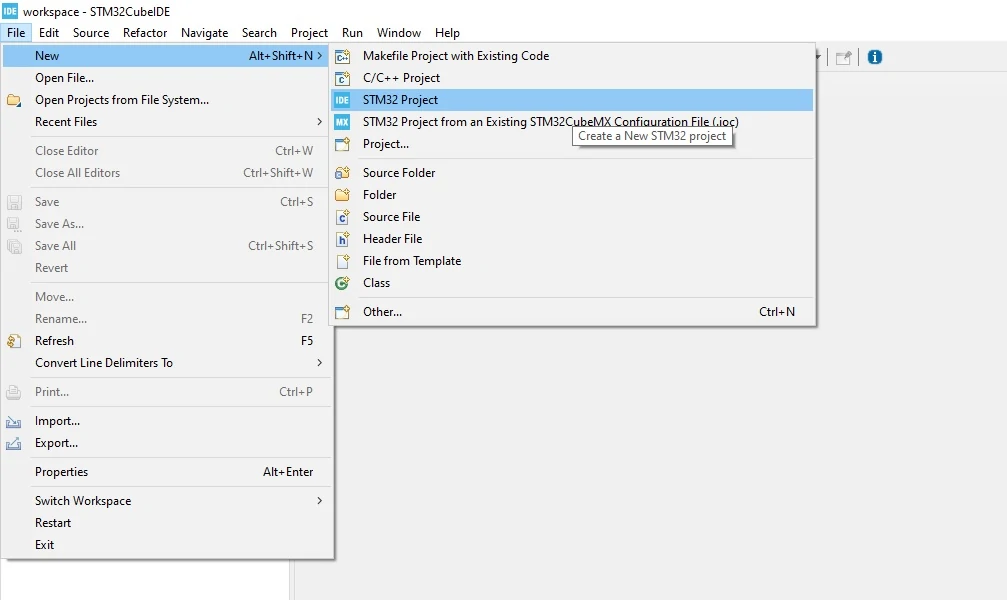
After a while, the program will start. Close the Welcome window and go to File -> New -> STM32 Project.
Then you need to select the correct MCU or Board. The advantage of choosing a board is that you will have pre-configured peripherals such as LED, Switch, or Clock.
I’m gonna use the latter option and in the Board selector, I’ll put the name of a specific Nucleo model I have. After selecting a record with the appropriate one, the details will be displayed. Description, photos, and all documentation. You don’t have to search for it on google, you will find everything here, which is super convenient.

Click Next button, when you are ready.
In this window, just give your project a name. I wanna keep the old, medieval tradition, so I’ll name this first project “Hello World” 🙂

Click Finish button.
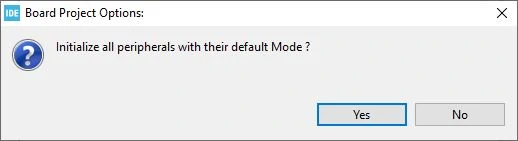
The IDE will ask you if you want to initialize all peripherals with the default settings. I recommend you agree, thanks to that you won’t have any problems with floating, collecting interference GPIOs.
STEP2. Configure the necessary peripherals in Device Configuration Tool
This tool is, in my opinion, the biggest advantage of STM32CubeIDE. But on the ST website, you can also download a completely independent version called STM32CubeMX. And then, generate a project for different IDEs (eg Keil). Here, however, it is nicely integrated which makes it very convenient to use.

Pinout & Configuration
In the main window, you will find a view of the selected microcontroller. For this guide, I chose the Nucleo-L053R8, so in the main window, you will see the model that’s on board. Thanks to this, we have pre-configured peripherals, such as Push Button or LED. This is super convenient. And you don’t need to extract this information from the evaluation board manual.
No more is needed for our first project.
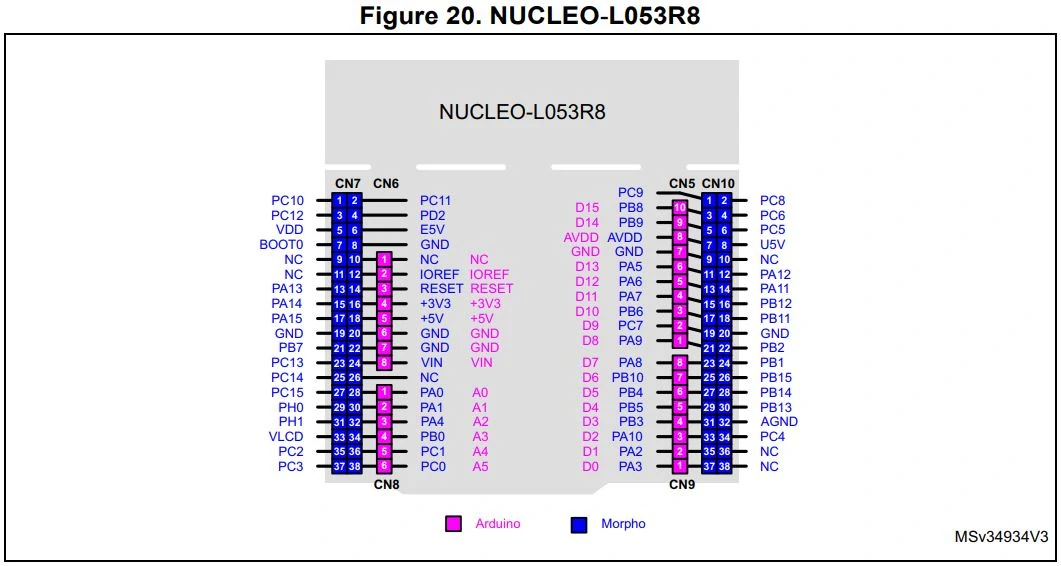
However, I assume that “Hello World” is just a warm-up project for you. And your next project will be more complicated and you’re gonna need other peripherals, e.g. ADC inputs, SPI, or I2C interface to communicate with a sensor. All evaluation boards have external terminals so you can connect whatever you want. It’s no different in Nucleo. To see the pin description just open the User Manual (you can find it in the MCU selector tool).
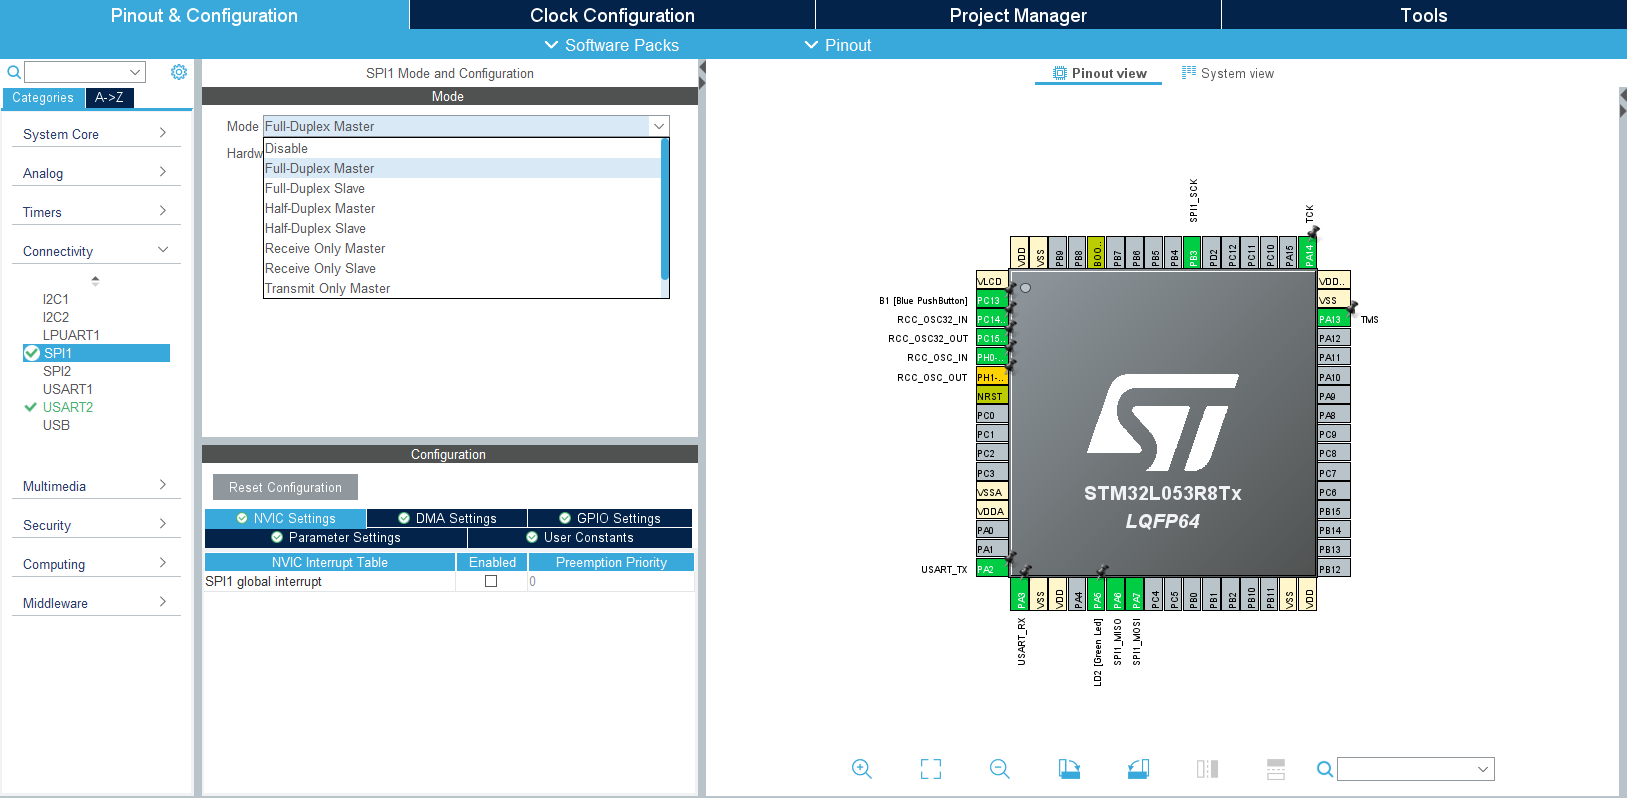
For example, if you want to use SPI in your project, on the left-hand side you search for it and change the mode from “Disable” to what you need. Below you can configure all parameters such as Clock, Data Size, Polarity, and Frame format. The IDE will automatically configure the correct pins. In this case, they are PB3, PA6, and PA7. Now, you just need to compare it with the pin description from the User Guide and you already know where to connect, what you want to “talk” via SPI.
In this way, configure all the peripherals that you need in a given project.
Clock Configuration
The clock tab is used (who would’ve thought) to configure the clock 🙂 You can use the built-in multipliers and dividers to choose the right clock frequencies for specific peripherals. This is especially important when you are using a custom PCB on which you are using a specific quartz resonator. Remember to make sure in the datasheet what’s the maximum allowable value for your uC.
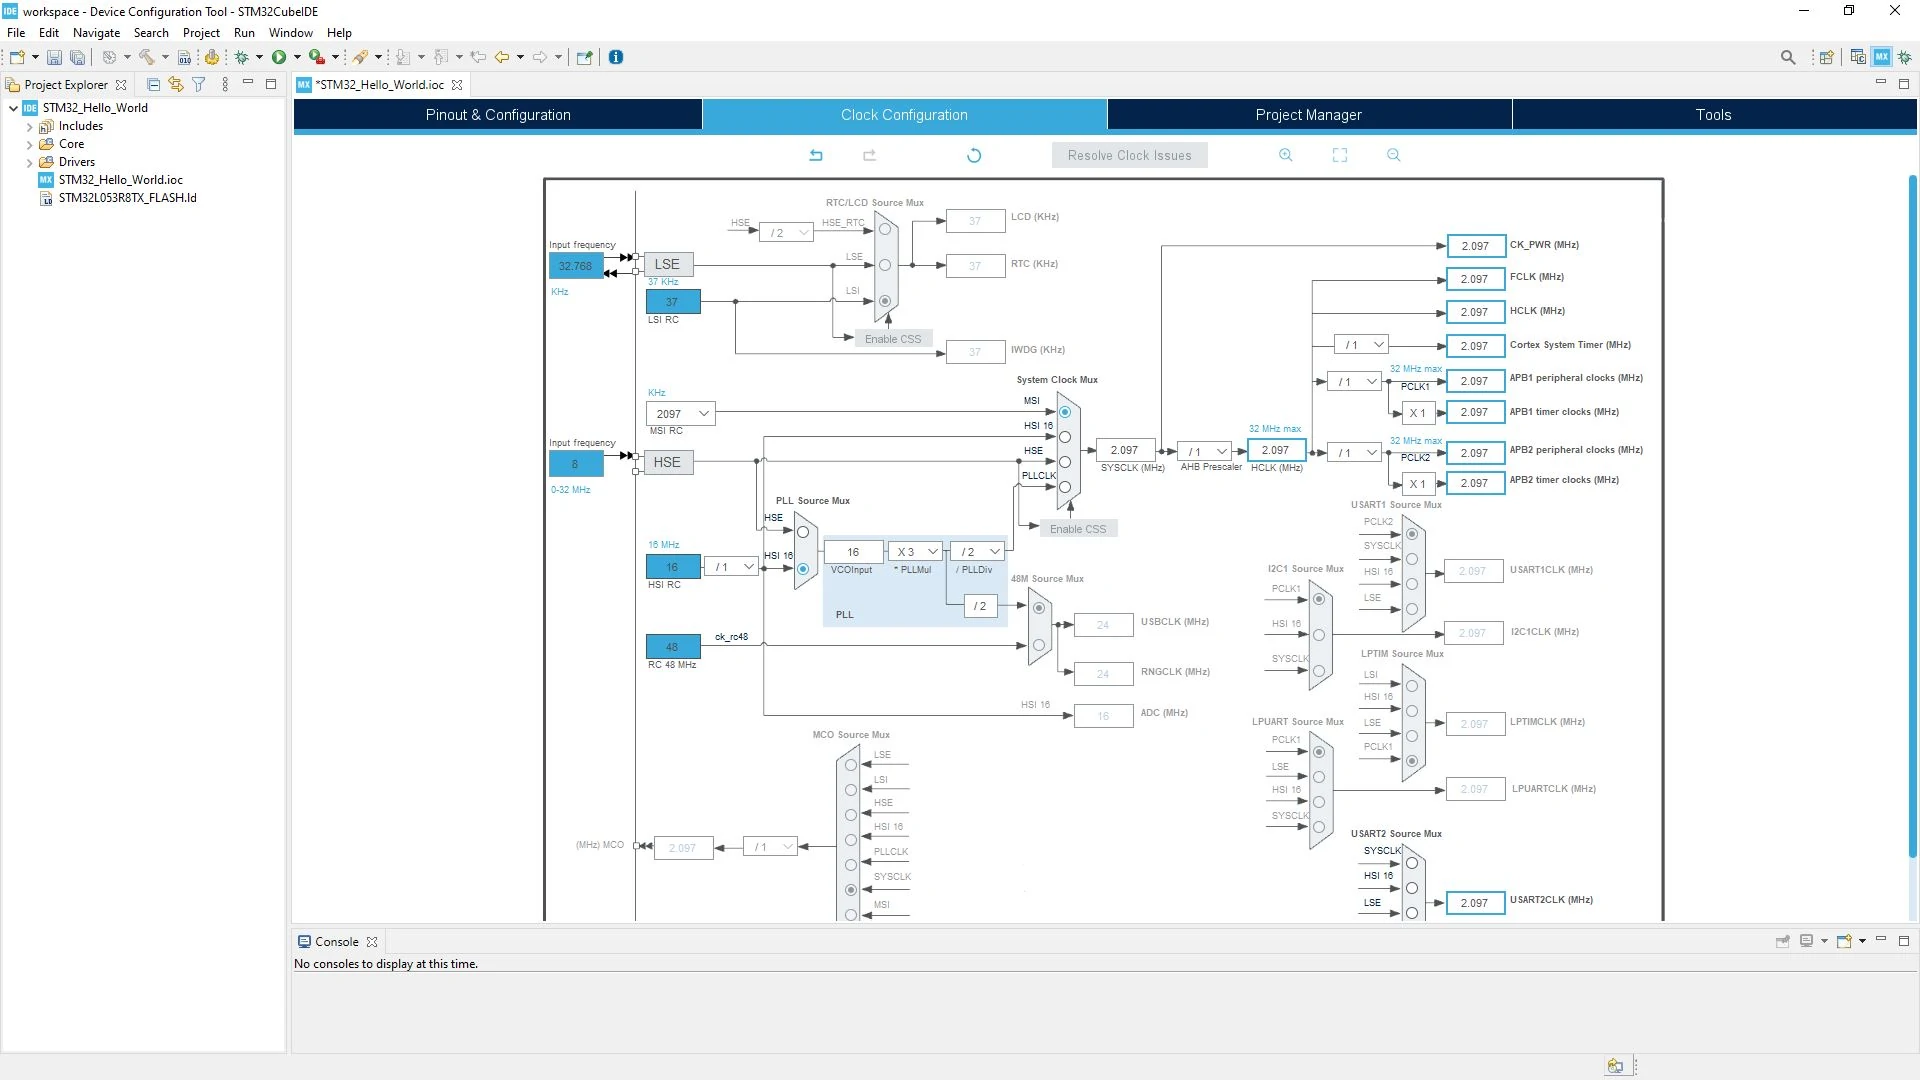
In our case, we don’t change anything here.
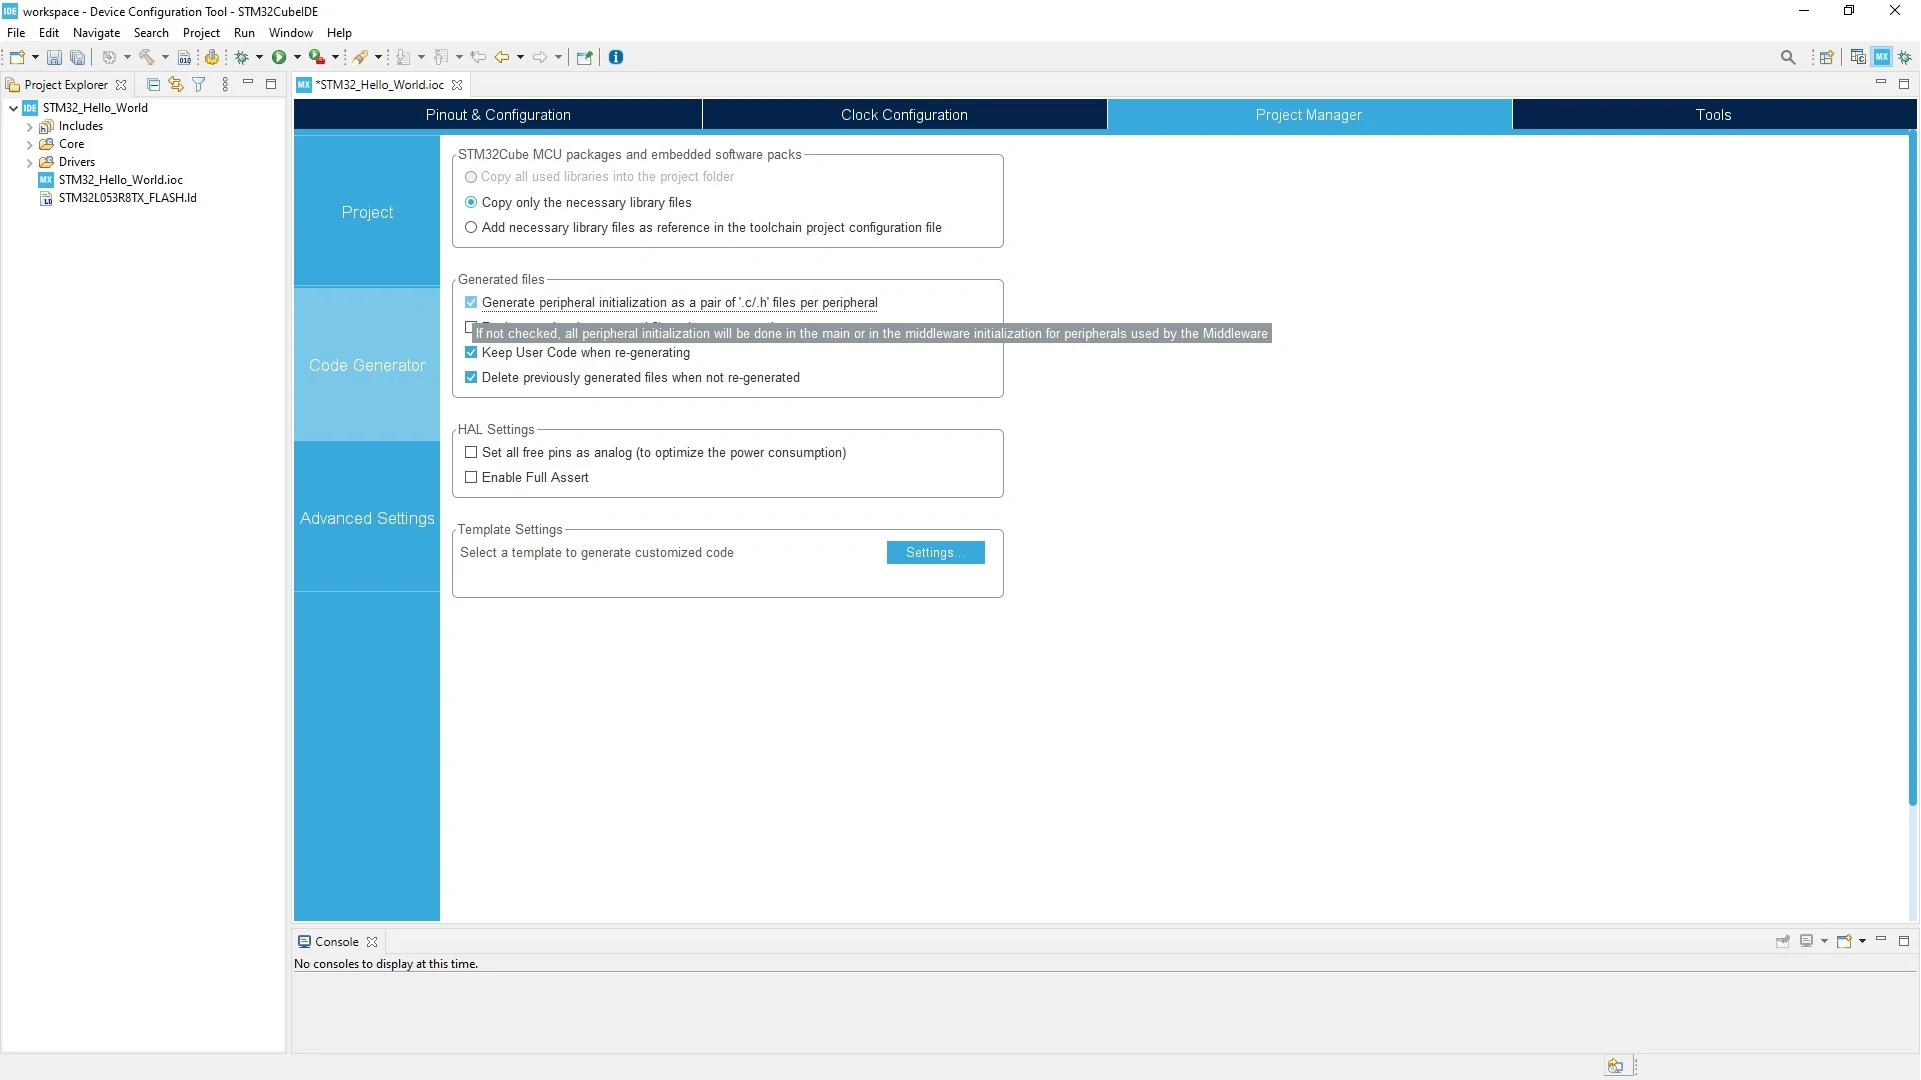
Project Manager
The last tab I wanted to tell you about is Project Manager. Here you can find general project settings such as path or project name. You can leave them as they are. However, I recommend you do one small change in the Code Generator sub-tab. Check the Generate peripheral initialization as a pair ‘.c / .h’ files per peripheral checkbox. Thanks to this, in my opinion, the generated project is more structured and it’s easier to find anything in it.
STEP 3. Generate the project
When you are ready generate the code of your pre-project. Don’t worry, you’ll be able to do this as many times as you want while developing your project. Go to Project -> Generate Code. The IDE will ask whether to save the project if you haven’t done it yourself. Of course, say yes.
This is how you generated your project template. It’s not doing anything yet, but you don’t have to worry about the initialization of any peripherals. “The only” thing left for you is to code what the program is actually supposed to do. The coolest part 🙂
STEP 4. Write your code
File structure
In the Project Explorer window, you’ll find all the files generated by Cube. If you checked that checkbox I mentioned above, all the source files are in the src directory and all the header files are in the inc directory.
For this simple design, there aren’t many of them. Configuration of an additional peripheral will result in generating a new pair of files with initialization. For Eg, if you wanted to use SPI you’d see spi.c and spi.h.

These files, however, don’t interest us now, go to the main and most important file – main.c.
Code structure
I’m not gonna go into detail now and describe the function of each verse. Writing code isn’t the subject of this guide. The only thing I would like to draw your attention to are the USER CODE blocks. You will find them in many places in the generated files.
You should ALWAYS write your code inside of them.

For the compiler itself, it doesn’t matter where you write your code. If it’s correct it’ll work even if it’s outside the USER CODE block.
However, if you come back to Configuration Tool, change anything in the configuration, and re-generate the project, everything outside of these blocks will be overwritten and your code will be removed. Therefore, remember to stick to this rule strictly.
Writing our code: Button and LED operation
This Hello World project is super simple and has only one useful function: show you the whole process of programming an SMT32 microcontroller from start to finish.
Therefore, all the code we will write is just a few lines. You can copy this and paste it into the while function.
	if(HAL_GPIO_ReadPin(B1_GPIO_Port, B1_Pin))
		HAL_GPIO_WritePin(LD2_GPIO_Port, LD2_Pin, GPIO_PIN_RESET);
	else
		HAL_GPIO_WritePin(LD2_GPIO_Port, LD2_Pin, GPIO_PIN_SET);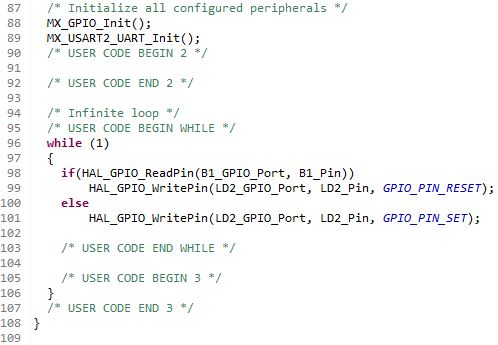
As you surely noticed, I put it inside the USER CODE block.
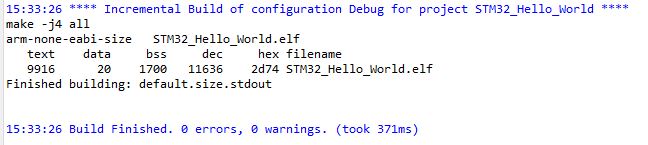
Bulid and program the STM32
To build a project, click the hammer icon on the toolbar, or go to Project-> Build All. After a while, you should see in the console below that there are no errors. If that’s the case, you are ready to program the chip.
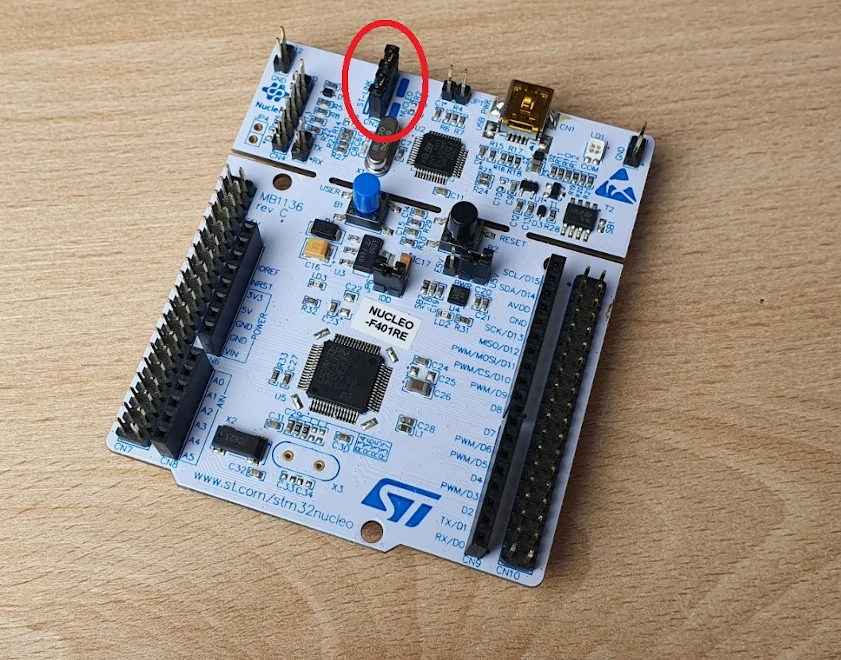
Before connecting the board to PC/MAC, make sure that the programmer jumpers are properly installed. Both should be on. If in the future you want to program a custom PCB then you will pull it out and you will be able to use this Nucleo as an external ST-Link V2 programmer.
To program STM32 click the bug icon or go to Run -> Run. Or the green play button on the toolbar.
If you’re doing this for the first time, the IDE needs to configure the programmer.
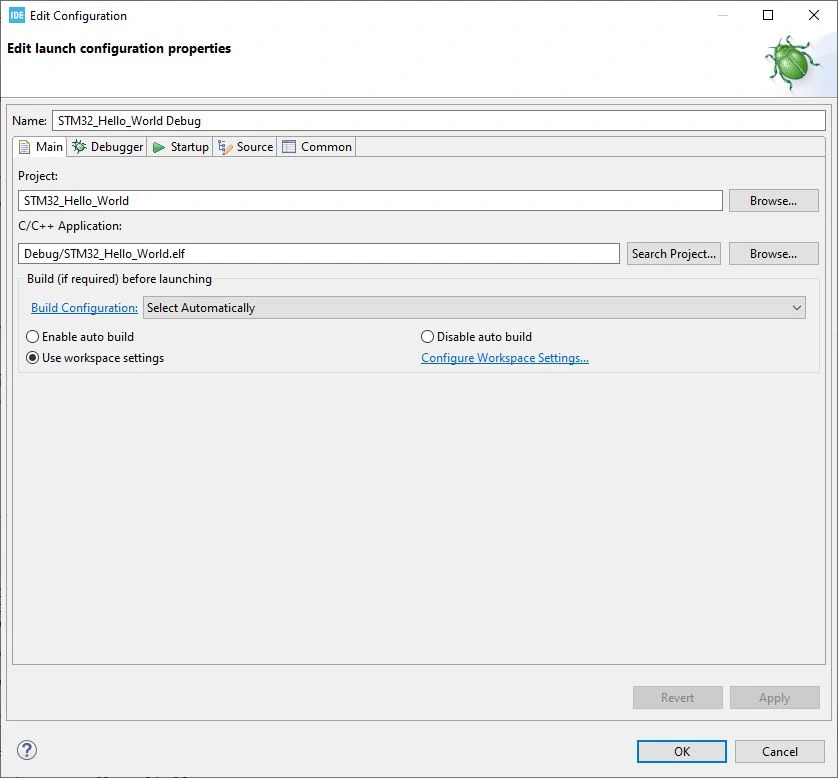
This window specifies the path to the binary file (.elf) that was generated by STM32CubeIDE. Luckily, you don’t need to change anything, the default configuration is ok.
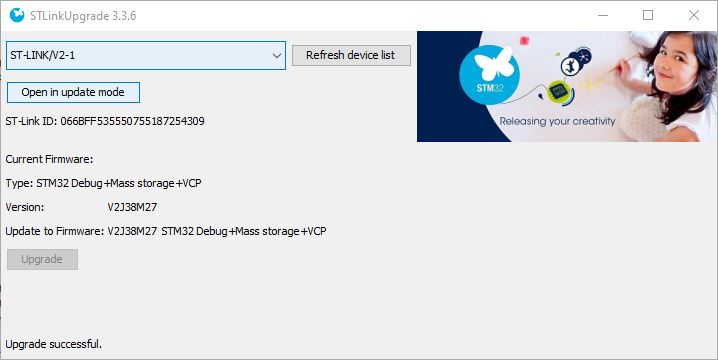
Additionally, if your programmer doesn’t have the latest firmware, you’ll see a message that it should be updated. It is optional, but I recommend you do it. You don’t need to install anything extra, the IDE has everything you need 🙂
Your microcontroller is programmed and ready to use. Let’s test it!
Summary
Thanks for making it to the end! 🙂 I hope that the LED on the board is also flashing. If you have any problem please don’t hesitate to contact me at contact@smartsolutions4home.com. I’ll try to help you.
In this article/guide you learned how to start your adventure with STM32 microcontrollers. Hope you use it and create something really cool!
Related Articles
Solar Panel for DIY Projects
Free energy from the sun – sounds great right? It…

How to start a Smart Home – Step-by-Step illustrated guide
This is the first article in the series in which…
How Relay works? – The Complete Illustrated Guide
The Relay (EMR or Electromagnetic Relay) is an electro-mechanical component…