
In this article, I’ll show you how I built my own version of modular RGB lights. Not only do they look great, but they also have Wi-Fi, so you can hook them up to any open “smart” system – Home Assistant in my case.
I’ll walk you through the whole process step by step, so you can build this project yourself too.
P.S. The whole thing is completely open-source. All the files you need (PCB, firmware templates, 3D parts, layout planner, etc.) are available on my website, so you can build the exact same thing — or use it as a starting point for your own variation.
Video version
If you prefer watching over reading, I’ve got you covered. Check out the video where I walk through the whole process.

Source files
The project is totally open-source, which means you can grab it and tweak it however you please. You can snag my design, the PCB layout, the 3D model, the bill of materials, and firmware – and make it exactly as is. Or, you can use it as a jumping-off point, make changes, and whip up something totally fresh.
Where can I buy it?
I’ve got blank PCBs available in my shop if you’re looking to kick off a project on your own.
JLCPCB
The sponsor of this project is JLCPCB. They made that beautiful board for this project. For a few bucks, and in a matter of days, you can have a professional PCB on your deck, ready to solder 🙂 Now, for new users, they provide up to $80 sign-up coupons.
And if you don’t feel up to it, they can solder all SMD components for you as well.
Introduction
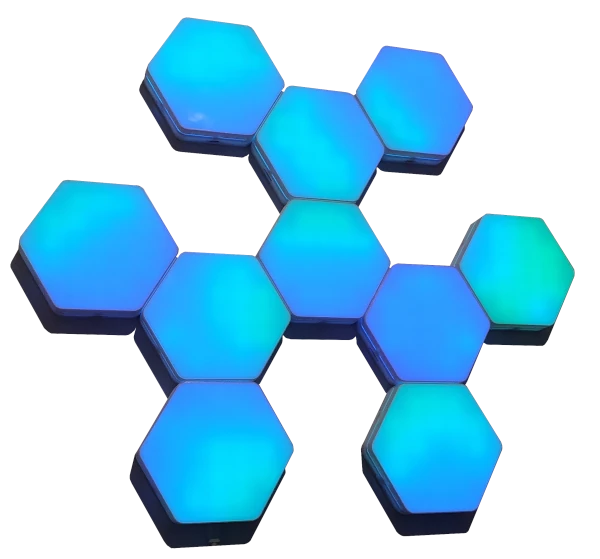
You’ve probably seen those colorful geometric LED panels on YouTube already. Even if you didn’t realize it.
A ton of creators use them as mood lighting in the background. They look awesome… until you check the price.
That was exactly my story with Nanoleaf-style panels. I really wanted something like that on my wall, but paying that much money for “just RGB light” didn’t quite sit right with me.
So instead of buying them, I built my own version — fully modular, smart, wall-mountable hexagon panels with proper XY LED matrices inside. I call this project LumiHex.
Backstory
Before I started, I searched YouTube and Google for “DIY Nanoleaf” and, of course, found a ton of projects. Some of them really good, some… less so. But none of them matched everything I personally wanted from a system like this.
What I had in my head was something that:
- wasn’t just pretty RGB in the background,
- integrated tightly with my smart home,
- could display information (not only colors),
- and was flexible enough to rearrange, expand or repurpose later.
At some point I realized: yeah, that exact combination just doesn’t exist yet.
And when something doesn’t exist, there’s only one logical option left: you build it yourself.
General Concept
LumiHex is not “just” wall RGB. Each hexagon is:
- a smart light,
- a notification display,
- a set of 6 physical buttons,
- and a modular building block you can arrange however you want.
All of that is tightly integrated with Home Assistant. And once you have that kind of integration, the panels stop being only mood lighting and become a visual interface to your home.
Schematic

The brain of each panel is an ESP32. That means:
- every module is its own smart device,
- they all connect to Wi-Fi individually,
- and can be flashed / updated independently.
For the lighting, I’m using WS2812 addressable RGB LEDs (also known as NeoPixels).
The important part is how they’re arranged.
Instead of gluing an LED strip around the perimeter, each panel contains a proper XY matrix — a 2D grid of pixels. That gives you:
- smooth gradients and effects,
- proper 2D animations,
- and even the option to show digits, glyphs or small icons.
For example, in the weather mode I can show a little sun, a cloud or a raindrop icon on a single panel.


On top of that, the PCB includes:
- 6 tact switches – one on each flat edge,
- 6 edge connectors – to chain panels together. They carry power and communication lines between modules – so effects can stay in sync even though each ESP32 runs its own firmware instance.
As for power. It comes in through a USB-C connector on the bottom side of the enclosure.
- At least one module in your layout needs USB-C populated.
- The rest can either:
- also have USB-C (if you want more flexibility later), or
- just have pin headers and get power from that first “main” module.
From an electrical perspective, all panels share the same 5 V and GND rail, so you can inject power at multiple points if you have a large layout and want to avoid voltage drop.
PCB
I went with a 4-layer PCB. I probably could’ve made it work with just 2 layers, but I really wanted to minimize voltage drop—especially when the power supply has to run through a long chain of modules. So I dedicated both internal layers entirely to 5V power distribution.
That’s also why I used two pins each for GND and VCC on every connector.
A reflow oven is pretty much perfect for soldering it. But you can totally get away with Hot Air (or a heat plate + Hot Air). You’ll just need to go through the soldering process twice. Aside from the extra time, it’s not really a big deal.
One minor inconvenience during assembly might be that the SMD components are mounted on both sides of the board. I specifically wanted the side with the LEDs to be as clean as possible—no extra components that could mess with the light distribution on the front panel.
To get that nice, even (and ideally as bright as possible) lighting, I also went with a white solder mask—and I definitely recommend you do the same.
That said, being completely honest with you—I haven’t compared how much of a difference it makes versus a different solder mask color (most likely green). The downside of white is that it’s more expensive to produce since it’s less commonly used, which means extra effort on the manufacturer’s end.


Mechanics

The main part of the enclosure is 3D printed using an FDM printer.
Aside from the enclosures, make sure to print some clamps and plugs too. You’ll need them to connect the modules together and to cover any unused openings.
How many you’ll need depends entirely on the layout you come up with.

For the final look, it’s crucial that the front panel diffuses light evenly. The best option by far is frosted acrylic—it’s hard to beat in terms of uniformity, smoothness, and that clean, premium feel.
The downside? It’s not the easiest material to work with. A CO2 laser cutter is perfect for the job (maybe there’s a local shop near you that could handle it?). A CNC router can work too, just with a bit more effort.
If acrylic isn’t an option on your end, you can totally 3D print the front panel instead. It’ll have some texture and won’t be perfectly smooth, but depending on your aesthetic preferences, it might still look totally fine.
Assembly
1. We’ll start the assembly by mounting the PCB to the bottom part of the case using three M3 (3mm) screws.

2. Next, glue the Front Panel to the top part of the enclosure. I used a single drop of cyanoacrylate glue in each corner of the hexagon.


3. Attach the top part of the enclosure to the bottom one. You’ll need six M3 (14mm) screws for that.
Important! The top part of the case rests directly on the momentary switches, so you can’t just tighten the screws all the way down. You’ll need to be gentle with this step.
Go slowly—and as soon as you hear a switch click, back the screw off just a bit.

4. The next step is to design the pattern you want to hang on your wall. This is also when you’ll figure out how many modules you actually need.
I’ve put together a simple web app to help you try out different layouts. You can add, remove, and rearrange the panels however you like.
Depending on where you connect them, each panel will be assigned different coordinates (those are the little numbers you’ll see on the panels)—but I’ll explain that part in more detail when we get to the configuration step.
5. Once you’ve settled on a layout, you can recreate the same pattern using the physical panels.
To connect them, use male-to-male pin headers. It’s by far the cheapest option—but honestly, it works perfectly fine for this.

6. Now it’s time to connect everything mechanically. For that, we’ll use those clips I mentioned earlier.
Just press them into the matching holes in the enclosure—nice and simple.

7. Now you can use the plugs to seal off any unused openings.
That way, the side walls look much cleaner—and it also helps prevent any light from leaking out of the inside.

8. The final step is mounting it on the wall. Each enclosure has a keyhole slot on the back for that.
You don’t have to use all of them, of course—just go with your gut :) For most layouts, using 2 or 3 mounting points should be more than enough.

Software
Before we dive into the software side of things, let’s clear up why each panel has its own ESP32 in the first place. I mean, one ESP32 is more than capable of handling all the panels, right? Plus, flashing each one individually for the first time definitely slows things down.
That’s all true — but despite that, I decided to go with the “one microcontroller per panel” setup for a couple of reasons.
First off, some of the panel designs just can’t be connected in a clean way using the kind of edge connectors I used. Addressable LEDs need to be connected in series, which means no branching allowed. I’d have to mess around with extra wiring to make it work, and I really wanted to avoid that.
The second reason is flexibility. I wanted to be able to reconfigure the layout however I wanted — even split it into two separate systems on different walls if needed.
ESPHome files generator
Like I mentioned earlier, I’m hooking up my LumiHex to Home Assistant using ESPHome — and I definitely recommend you do the same. It’s a super convenient middleman between your device and HA.
For it to work, though, the device needs to be properly configured. That’s why I put together a form that’ll quickly and easily generate a full set of files you’ll need to get everything up and running.
All you have to do is enter a base name for your lamp — each additional one will automatically get a suffix like "_X", where X is the panel number.
Then, just type in how many panels you’re planning to use.
Once that’s done, hit “Generate” and you’re good to go.
Turns out there’s a small bug in my generator :/
So I’ve temporarily taken it down—I’ll fix it as soon as I can and put it back up on the site.
In the meantime, you can still download the files along with the others. The only catch is that you’ll have to manually enter the device name and duplicate the config files based on how many panels you want to create.
But I’m sure that won’t be a problem for you :)
Adding configuration files to ESPHome

To upload files to ESPHome, there are a few ways to go about it. Personally, I recommend using the “Studio Code Server” add-on. The best part? No setup needed—it works right out of the box once installed.
Basically, this plugin is used for editing files, and honestly, I think it's way better than the default editor built into Home Assistant. Plus, it gives you a nice view of the entire folder structure, which is super handy.
All you need to do now is drag and drop all the files you just generated. That’s it!
Editing files
As you might’ve noticed, among the generated files (aside from the ones for specific lights), there’s one with a "_base" suffix.
That’s where the core of the configuration lives. All the effects and everything else are set up there. Each individual file just imports that base file.
The cool thing is, if you ever want to add a new effect later on, you only need to do it in that one file—it’ll apply to all the others automatically.
Let’s get back to the coordinates for each panel—the numbers you saw in the app when setting up the layout.
You’ll need to add those into each file before flashing everything. That way, some effects can “spill over” beyond a single light.
This lets you create effects that run across all the lights at once, while still showing different things on each one—so the whole animation looks smooth and coordinated.


Now the only thing left is to flash everything.
The first time, you’ll need to use any USB-UART adapter. After that, you can use OTA for all future uploads.

Summary
And that’s it! Your very own “smart” RGB decor panel is all set. Time to kick back, relax, and enjoy the view.
LumiHex started as “I don’t really want to pay that much for Nanoleaf” and ended up as a pretty capable, fully open-source modular smart-light system.
If you’d like to see LumiHex in action, I highly recommend watching the accompanying YouTube video embedded in this post — it’s much easier to appreciate the animations and effects when you see them moving.


Related Articles

SS4H-ZRG Zigbee Rain Gauge – DIY project based Zigbee Door Sensor
In this article, I’m going to show you how to...

SS4H-SSR Smart Extension Board – DIY project based on ESP8266
With these kinds of projects, they are often created when...

SS4H-SHH Smart Home Hub based on ESP32 POE
Personally, I’m a fan of centralized “smart” systems. Thanks to...